A bunch of great guys to help on the final flip over day in early April 2011.
This is the strongback with the sadle installed that holds the boat secure while interior work is done.
The flip is complete, no issues. The boat is not heavy, just awkward to get a grip on. Note that in the previous picture that we had cotton gloves with the blue rubber grip finger and palm areas.
These help quite a bit.
These are the patterns for the cap rails as positioned on the mahogany boards that I will use.
Prior to marking the pattern pieces on to the boards, I planed them down to about 5/8" thick.
Here is one of the cap rail pieces as I am rounding the edges over with the Sureform.
Note the nib scarf joint that I used.
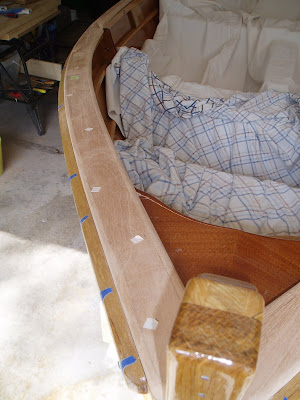
Here I am marking all the screw locations with masking tape pieces. The blue tape is marking the screws that were used to attach the shear clamp. I wanted the screws that were going to hold the cap rails to have a nicely spaced look. By marking there location with small pieces of masking tape I could make small adjustments while keeping a eye on where the shear clamp screws are.
This is a close up of the nib scarf on the starboard side cap rail.
Clamping and adding the screws for the cap rails.
Close up of the nib scarf.
The cap rails have been glued on using System 3, T-88 Strucural Epoxy and the screw hole plugged with mahogany plugs made from scrap pieces from cutting out thr cap rail pieces.
Trimming off the plugs.
Clamping and gluing the cap on the top of the transom. This piece of mahogany is 5/16" thick.
I steamed the 5/16" thick pieces and clamped them to this form made from a piece of 2X4.
The curve that is cut on the form is over exagerated to account for some spring back of the mahogany.
After the clamps were removed, the mahogany piece had a lot of springback, as shown here. There is still some curve in the piece as shown in contrast to the straight piece of wood above the 5/16" mahogany piece
Here is the hanger assembly attached to the CB.
Inserting the CB and hanger assembly into the CB trunk.
Close up view of the assembly being inserted into the trunk. Note, the slot for the bolt head, there is a matching slot on the other side for the nut. There is a routed recess to receive the hanger also.
The CB and hanger assembly is inserted all the way and the hanger is screwd down.
All the screw holes are filled with Dolphinite and the screw threads are coated as well.
A sealing gasket is installed all the way around as shown by the grey band here. Then the CB cap is installed.
Here is the CB cap installed. The silicon bronze screws are coated with Dolphinite before screwing in. Mounting the CB this way eliminates the pivot hole running through the CB trunk where it semmed difficult to me to keep it sealed up. This is a system that the guys in the Chrysler Mutineer group that I was in, had developed so that you wouldn't have to crawl under the boat and trailer to try to work on the CB. So, I gave it a try,,,time will tell.
The access port on the bow seat.
Here the access port is opened. I have attached a dry bag with a line to the back of the access port door to easily recover storage items if needed.
View of the Centerboard trunk. The cam cleat is a Ronstan RF-58
Boom jaw and downhaul. Also shown are the halyard cleats and line for the jib and main.
|
|
| Here is the sail when it is hoisted. Note how the Yard Retaining Line is holding the yard against the mast. You can do this with a simple loop of line around the mast and yard, (a parrel) however when the sail is lowered, I want the sail and yard to fall onto the boom in a more aft position then what a simple parrel will allow. This becomes more apparent when you look at the details in the "Reefing and Topping Lift Lazy Jacks" page. |
Here is the rudder head with the pintles installed. I tried to bronze plate the stainless pintles with an in home kit from Caswell. It work pretty good.
Port side rigging showing the cam cleat for the jib. The cam cleat is a Davey and Company Tufnol model for 8-10 mm line with a stainless steel bail wire. It is mounted a mahogany riser plate.
Forward view of port side rigging. This view shows the shroud set up.
The small Schaefer roller furler for the jib. Works really good, at least while driveway sailing :)
Note the brass lever to secure the rudder blade.
Note the brass pin with leather cord to hold the tiller to the rudder head.
Starboard side rigging. The black line is the roller fuller line that runs through a bronze tubular jam cleat.
A more complete view of starboard side.
Interior shot.
All running and standing rigging is New England Rope 3 strand spun classic Dacron Polyester.
1/4" diameter used for jib sheet, halyards, and standing rigging.
5/16" used for the main sheet.
This line has a nice feel in hand and has a classic old school look.
Turks head at the end of the tiller to protect the mahogany rail when the tiller is hard over.
The traveler system.
This is an "Old Man Wind" carving that my Dad did. Even though Dad couldn't be with us for the launch, he will always be watching over things from the bow seat.


No comments:
Post a Comment